3-3 Developing GStreamer Plugins
GStreamer plugins are modular components that extend the functionality of the GStreamer multimedia framework by providing specific capabilities like data sources, filters, encoders, decoders, and sinks. Each plugin contains one or more elements that perform a particular task, such as reading from a file, decoding video, applying effects, or streaming media over a network. Plugins are categorized into groups like base, good, bad, and ugly based on their quality, licensing, and stability. They allow developers to create complex media pipelines by combining elements dynamically, making GStreamer highly flexible and extensible for diverse multimedia applications.
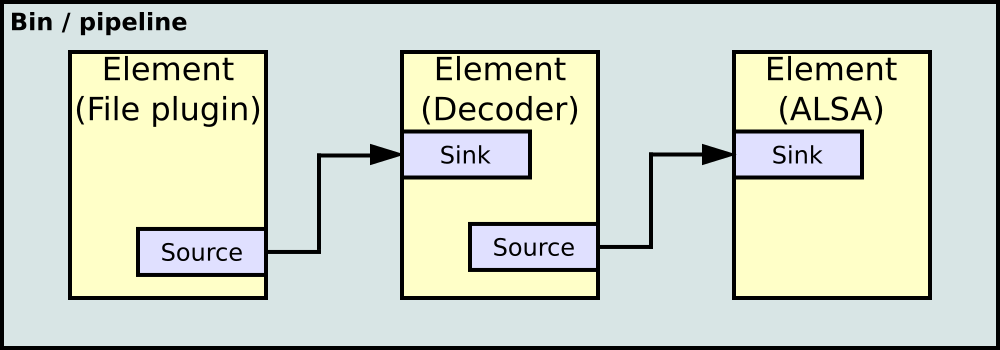
The image below shows how GStreamer elements are linked as a pipeline.
Installing GStreamer
To install GStreamer on Ubuntu 22.04, use the following command:
sudo apt install libgstreamer1.0-dev libgstreamer-plugins-base1.0-dev libgstreamer-plugins-bad1.0-dev gstreamer1.0-plugins-base gstreamer1.0-plugins-good gstreamer1.0-plugins-bad gstreamer1.0-plugins-ugly gstreamer1.0-libav gstreamer1.0-tools gstreamer1.0-x gstreamer1.0-alsa gstreamer1.0-gl gstreamer1.0-gtk3 gstreamer1.0-qt5 gstreamer1.0-pulseaudio
Try out this Hello World tutorial below by creating a program named 'basic-tutorial-1.c`.
#include <gst/gst.h>

#ifdef __APPLE__
#include <TargetConditionals.h>
#endif

int
tutorial_main (int argc, char *argv[])
{
  GstElement *pipeline;
  GstBus *bus;
  GstMessage *msg;

  /* Initialize GStreamer */
  gst_init (&argc, &argv);

  /* Build the pipeline */
  pipeline =
      gst_parse_launch
      ("playbin uri=https://gstreamer.freedesktop.org/data/media/sintel_trailer-480p.webm",
      NULL);

  /* Start playing */
  gst_element_set_state (pipeline, GST_STATE_PLAYING);

  /* Wait until error or EOS */
  bus = gst_element_get_bus (pipeline);
  msg =
      gst_bus_timed_pop_filtered (bus, GST_CLOCK_TIME_NONE,
      GST_MESSAGE_ERROR | GST_MESSAGE_EOS);

  /* See next tutorial for proper error message handling/parsing */
  if (GST_MESSAGE_TYPE (msg) == GST_MESSAGE_ERROR) {
    g_printerr ("An error occurred! Re-run with the GST_DEBUG=*:WARN "
        "environment variable set for more details.\n");
  }

  /* Free resources */
  gst_message_unref (msg);
  gst_object_unref (bus);
  gst_element_set_state (pipeline, GST_STATE_NULL);
  gst_object_unref (pipeline);
  return 0;
}

int
main (int argc, char *argv[])
{
#if defined(__APPLE__) && TARGET_OS_MAC && !TARGET_OS_IPHONE
  return gst_macos_main ((GstMainFunc) tutorial_main, argc, argv, NULL);
#else
  return tutorial_main (argc, argv);
#endif
}
Compile it by using the command below:
gcc basic-tutorial-1.c -o basic-tutorial-1 `pkg-config --cflags --libs gstreamer-1.0`
If everything is built correctly, you may run the executable. You should see a window pop up, containing a video being played straight from the Internet, along with audio.
Examples:
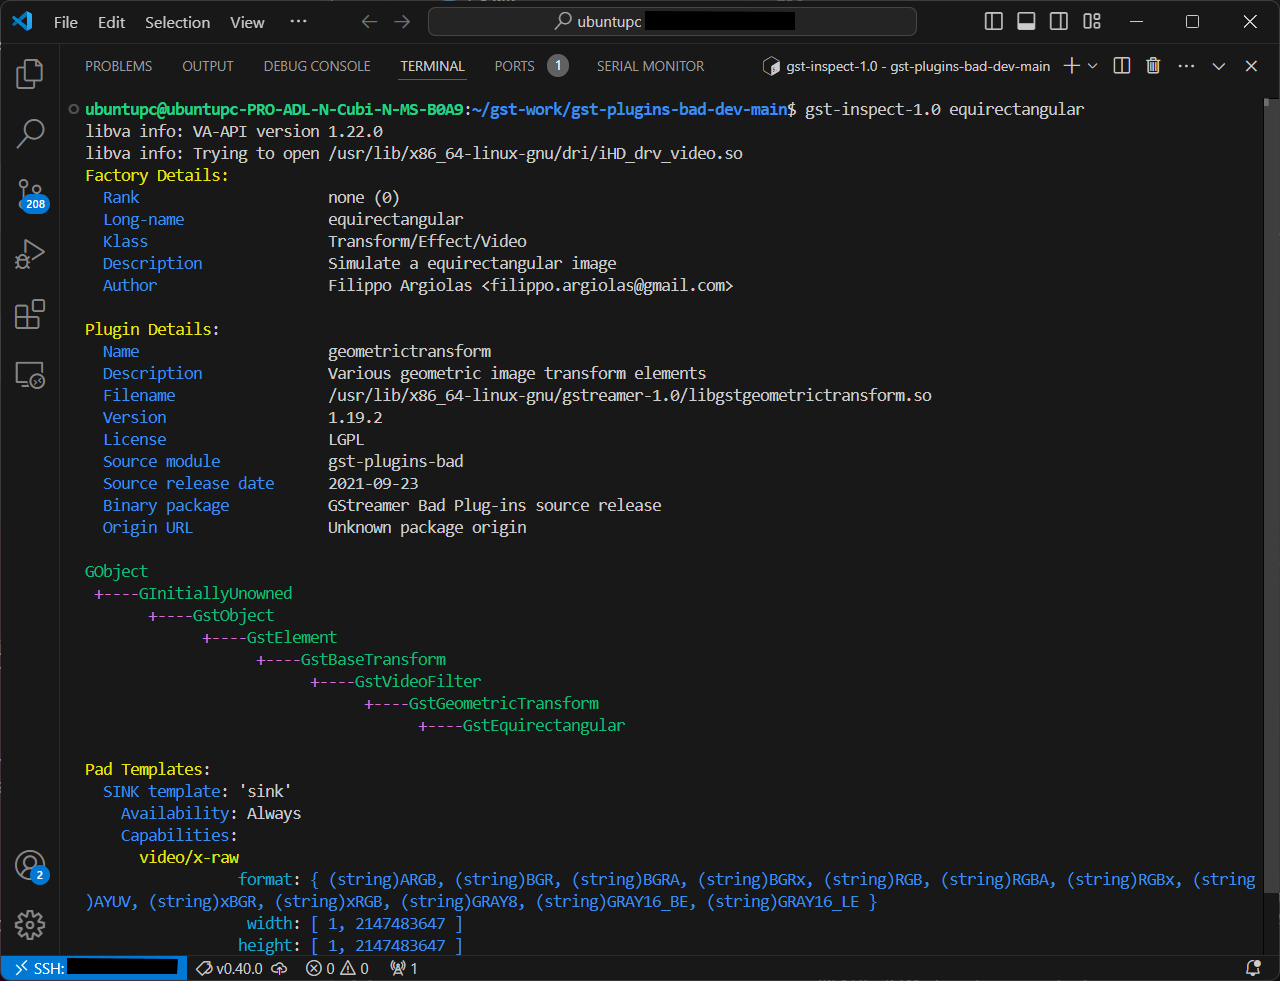
gst-inspect-1.0 geometrictransform
gst-inspect-1.0 circle
The commands above will show information such as the source module, plugin and element.
gst-launch-1.0 videotestsrc pattern=0 ! autovideosink
Different patterns can be generated by adjusting the pattern parameter from 0 to 25.
gst-launch-1.0 videotestsrc ! video/x-raw, width=1920, height=1080 ! videoconvert ! circle ! videoconvert ! autovideosink
Feel free to play around by adding more parameters and observe the output!
Set Up Development Environment Using gst-plugins-bad-dev
The gst-plugins-bad-dev package is part of the GStreamer multimedia framework and provides the development files needed for working with the "bad" set of plugins in GStreamer.
GStreamer plugins are modular components that extend the functionality of GStreamer by providing support for various codecs, formats, protocols, and other multimedia capabilities. These plugins are grouped into four categories based on their stability and quality:
Base: Stable, well-maintained, and widely used plugins.Good: Good-quality plugins that are reliable and free from licensing issues.Bad: Experimental plugins that are under development or have known issues (may require more testing or refinement).Ugly: High-quality plugins with licensing or patent concerns.
Download the modified project here by cloning the GitHub repo below:
git clone https://github.com/yourskc/gst-plugins-bad-dev
which is developed based on the original project.
This modified project includes a new element named equirectangular as part of the gst-plugins-bad geometric transform plugin. It contains GStreamer code units, build instructions, and test commands.
Installing Meson
Install the Meson build system:
sudo apt-get install python3 python3-pip python3-setuptools python3-wheel ninja-build
Go to the gst-plugins-bad-dev directory and start the build:
meson build
ninja -C build
If meson is not installed, use the command below to install it.
sudo apt install meson
Verify the build by checking the creation of the file libgstgeometrictransform.so in the directory gst-plugins-bad-dev/build/gst/geometrictransform.
Install the library and inspect:
sudo cp ./build/gst/geometrictransform/libgstgeometrictransform.so /usr/lib/x86_64-linux-gnu/gstreamer-1.0
gst-inspect-1.0 equirectangular
The expected output should be:
Testing With Various Sources
Test Source
Basic test with video test source:
cd test_env
gst-launch-1.0 videotestsrc ! video/x-raw,width=1920,height=1080 ! videoconvert ! equirectangular ! videoconvert ! autovideosink
Ensure the execution directory contains EquimatX and EquimatY files.
MP4 File
To test with mp4 files, use the example below:
gst-launch-1.0 playbin uri=file:///path/to/video.mp4 video-sink="videoconvert ! equirectangular ! videoconvert ! autovideosink"
Try another example:
gst-launch-1.0 filesrc location=endo01.mp4 ! qtdemux ! queue ! avdec_h264 ! videoconvert ! equirectangular ! videoconvert ! autovideosink
Still image test:
gst-launch-1.0 filesrc location=image1920.jpg ! decodebin ! imagefreeze ! videoscale ! video/x-raw,width=1920,height=1080 ! videoconvert ! equirectangular ! videoconvert ! autovideosink
gst-launch-1.0 playbin: a high-level, automated pipeline setupgst-launch-1.0 filesrc: a low-level, fully customized pipeline
Network Streaming
Now, we will test out network streaming. On the mini PC, run:
gst-launch-1.0 -v udpsrc uri=udp://127.0.0.1:5000 ! application/x-rtp, media=video, payload=96, encoding-name=H264 ! rtph264depay ! avdec_h264 ! videoconvert ! autovideosink
The mini PC will wait for an incoming stream. For the source, we will run the command below on the remote terminal in VS Code.
gst-launch-1.0 videotestsrc ! video/x-raw, width=1920, height=1080 ! videoconvert ! equirectangular ! videoconvert ! x264enc ! rtph264pay config-interval=10 ! udpsink host=127.0.0.1 port=5000
The output will be displayed on the mini PC.
USB Camera
First, connect a USB camera to mini PC and replace the source in the command as shown below:
gst-launch-1.0 v4l2src device=/dev/video0 ! videoscale ! video/x-raw, width=1920, height=1080 ! videoconvert ! equirectangular ! videoconvert ! x264enc ! rtph264pay config-interval=10 ! udpsink host=localhost port=5000
The camera output will be displayed.
To install Video4Linux, run sudo apt-get install v4l-utils. A few useful commands include:
v4l2-ctl --list-devices: list all camera devicesv4l2-ctl -d /dev/video0 -D: display driver informationv4l2-ctl -d /dev/video0 --list-formats-ext: display all supported image formats