2-2 Setting Up Docker Container to Build Linux BSP for RZ/G2L
In this tutorial, we will learn how to setup a Docker container to build a Linux BSP for RZ/G2L. Then, we will write the image into an SD card and boot up RZ/G2L from it.
Step 1: Create an Image Using a Dockerfile
To create an image, we will use a Dockerfile, which is a set of commands that will set up the container for us.
There are a few Ubuntu versions you may install:
- Dockerfile.rzg_ubuntu-20.04
- Dockerfile.rzg_ubuntu-18.04
- Dockerfile.rzg_ubuntu-16.04
In this tutorial, we will use Dockerfile.rzg_ubuntu-20.04.
Please click here to download it.
Step 2: Building from Dockerfile
To build a Docker image, use the command below:
docker build --no-cache \
  --build-arg "host_uid=$(id -u)" \
  --build-arg "host_gid=$(id -g)" \
  --build-arg "USERNAME=$USER" \
  --build-arg "TZ_VALUE=$(cat /etc/timezone)" \
  --tag rz_ubuntu-20.04 \
  --file Dockerfile.rzg_ubuntu-20.04  .
You may change the --tag name according to your preferences. Then, confirm your images are created by using this command:
docker images
The output should look something like this:
REPOSITORY           TAG       IMAGE ID       CREATED          SIZE
rz_ubuntu-20.04      latest    960cf1be32b0   57 seconds ago   1.25GB
Step 3: Start and Run Your Container
Now that we have created the image, we can start a container using that image.
mkdir -p /home/$USER/yocto

docker run -it \
  --name=my_container_for_20.04 \
  --volume="/home/$USER/yocto:/home/$USER/yocto" \
  --workdir="/home/$USER" \
  rz_ubuntu-20.04
docker run: Run a processes in isolated container-it: Starts a command shell inside your container that you can interact with--name: Chooses a name for your container--volume: Choose a directory on your host machine that you want to map inside your container to use as your shared directory--workdir: Choose a default directory where you want to start inside your container, for example your shared directory
You will now be running in a command line shell inside your container. Now exit your container by typing exit.
your_username@(docker)$ exit
$ docker images         # shows you your availible images
$ docker ps             # shows running containers
$ docker ps -a          # shows all containers (running and not running)
$ docker start -i <container>
$ docker rm <container> # remove a container
$ docker rmi <image>    # remove a image
Step 4: Download Renesas VLP Packages
Download the packages here: RZ/G Verified Linux Package [5.10-CIP]
These are the packages and patch files that you need to install:
Packages:
- RTK0EF0045Z0021AZJ-v3.0.6-update3.zip
- RTK0EF0045Z13001ZJ-v1.2.2_EN.zip
- RTK0EF0045Z15001ZJ-v1.2.2_EN.zip
Patch Files:
When the download is completed, move all the files into the yocto directory.
After downloading the packages, please remember to remove the hash appended to the file name to prevent any errors!
Step 5: Extract the Downloaded Packages
Unzip .zip files under the directory home/user/yocto.
unzip RTK0EF0045Z0021AZJ-v3.0.6-update3.zip
unzip RTK0EF0045Z13001ZJ-v1.2.2_EN.zip
unzip RTK0EF0045Z15001ZJ-v1.2.2_EN.zip
Create a new directory named yocto in your Dev Container and move to the working directory.
mkdir yocto
cd yocto
Extract .tar.gz files.
tar zxvf ../RTK0EF0045Z0021AZJ-v3.0.6-update3/rzg_vlp_v3.0.6.tar.gz
tar zxvf ../RTK0EF0045Z13001ZJ-v1.2.2_EN/meta-rz-features_graphics_v1.2.2.tar.gz
tar zxvf ../RTK0EF0045Z15001ZJ-v1.2.2_EN/meta-rz-features_codec_v1.2.2.tar.gz
List out the files in the working directory to verify the package contents.
ls -l
If the output is as follows, the packages are installed correctly.
extra
meta-gplv2
meta-openembedded
meta-qt5
meta-renesas
meta-rz-features
meta-virtualization
poky
Step 6: Apply Patch Files
Apply a patch file to update vlp to update3.
patch -p1 < ../RTK0EF0045Z0021AZJ-v3.0.6-update3/vlpg306-to-vlpg306update3.patch
Move to the meta-renesas directory.
cd meta-renesas
Apply patch file extras.
patch -p1 < ../extra/0001-rz-common-recipes-debian-buster-glibc-update-to-v2.2.patch
patch -p1 < ../extra/0001-rz-common-linux-update-linux-kernel-to-the-latest-re.patch
patch -p1 < ../extra/0001-rz-common-gst-plugins-bad-Depending-bayer2raw-if-lay.patch
Move back the working directory.
cd ..
Please move the two patch files 0001-gstreamer-moil-plugin.patch and 0002-fix_qtsmarthome_url.patch into the yocto directory before applying the patch commands below.
Apply a patch file to add the GStreamer Moil Plugin.
patch -p1 < 0001-gstreamer-moil-plugin.patch
Apply a patch file to fix the Qt Smart Home URL.
patch -p1 < 0002-fix_qtsmarthome_url.patch
Step 7: Initialize and Start Image Build
Enter back into your container by using:
docker start my_container_for_20.04
docker exec -it my_container_for_20.04 /bin/bash
Initialize a build using the oe-init-build-env script in Poky and set environment variable TEMPLATECONF to the below path.
cd yocto
TEMPLATECONF=$PWD/meta-renesas/meta-rzg2l/docs/template/conf/ source poky/oe-init-build-env build
Run the following commands to add necessary layers for AI application to build/conf/bblayers.conf (configration file for layers).
bitbake-layers add-layer ../meta-rz-features/meta-rz-graphics
bitbake-layers add-layer ../meta-rz-features/meta-rz-codecs
During this step, you might encounter this error:
ERROR: The following required tools (as specified by HOSTTOOLS) appear to be unavailable in PATH, please install them in order to proceed:
  chrpath cpio diffstat gawk
If this happens, install the required packages by running:
sudo apt update
sudo apt install chrpath cpio diffstat gawk -y
Run the following command to build the weston image.
MACHINE=smarc-rzg2l bitbake core-image-weston
Building images for the first time typically takes a few hours to complete. You may disconnect from the Dev Container during this process.
To build the qt5 image, run the following command to add the meta-qt5 layer.
bitbake-layers add-layer ../meta-qt5
If you want to add qt5 demonstration to core-image-qt, add the following to your local.conf file.
QT_DEMO = "1"
Run the following command to build the qt5 image.
MACHINE=smarc-rzg2l bitbake core-image-qt
Step 8: Flashing Into SD Card
Exit the Dev Container and reconnect to host. Then, go to the ~/build/tmp/deploy/images/smarc-rzg2l directory. Under this directory, you will see a list of the output files from the build.
Sample output files:
core-image-qt-smarc-rzg2l.wic.gz
core-image-qt-smarc-rzg2l.wic.bmap
Insert the SD card into the PC and check the device ID of the SD card by running:
sudo fdisk -l
Flash the image into SD card:
sudo bmaptool copy core-image-qt-smarc-rzg2l.wic.gz /dev/sda
If the flash is unsuccessful or showing that the device is busy, unmount /dev/sda1 and /dev/sda2 by running these commands below and try again.
umount /dev/sda1
umount /dev/sda2
Step 9: Booting Up from SD Card
Insert the SD Card into the RZ/G2L board, connect the power input and serial monitor to your personal PC and boot up by long pressing the red button.
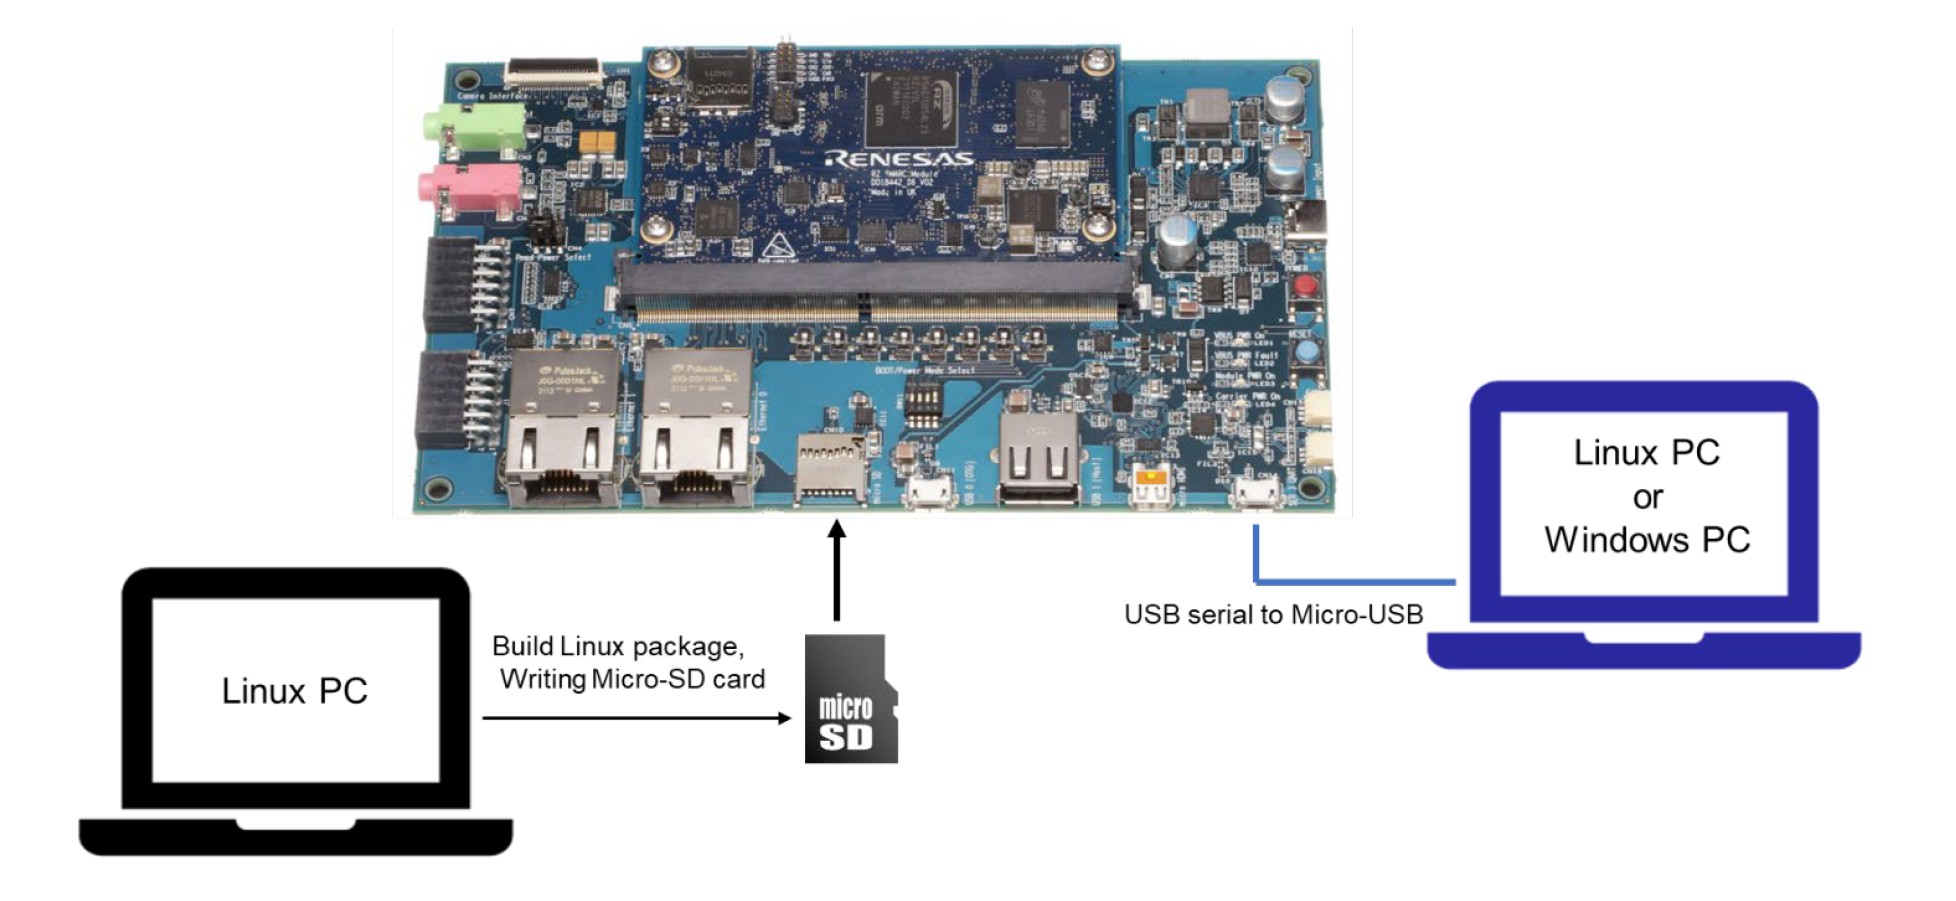
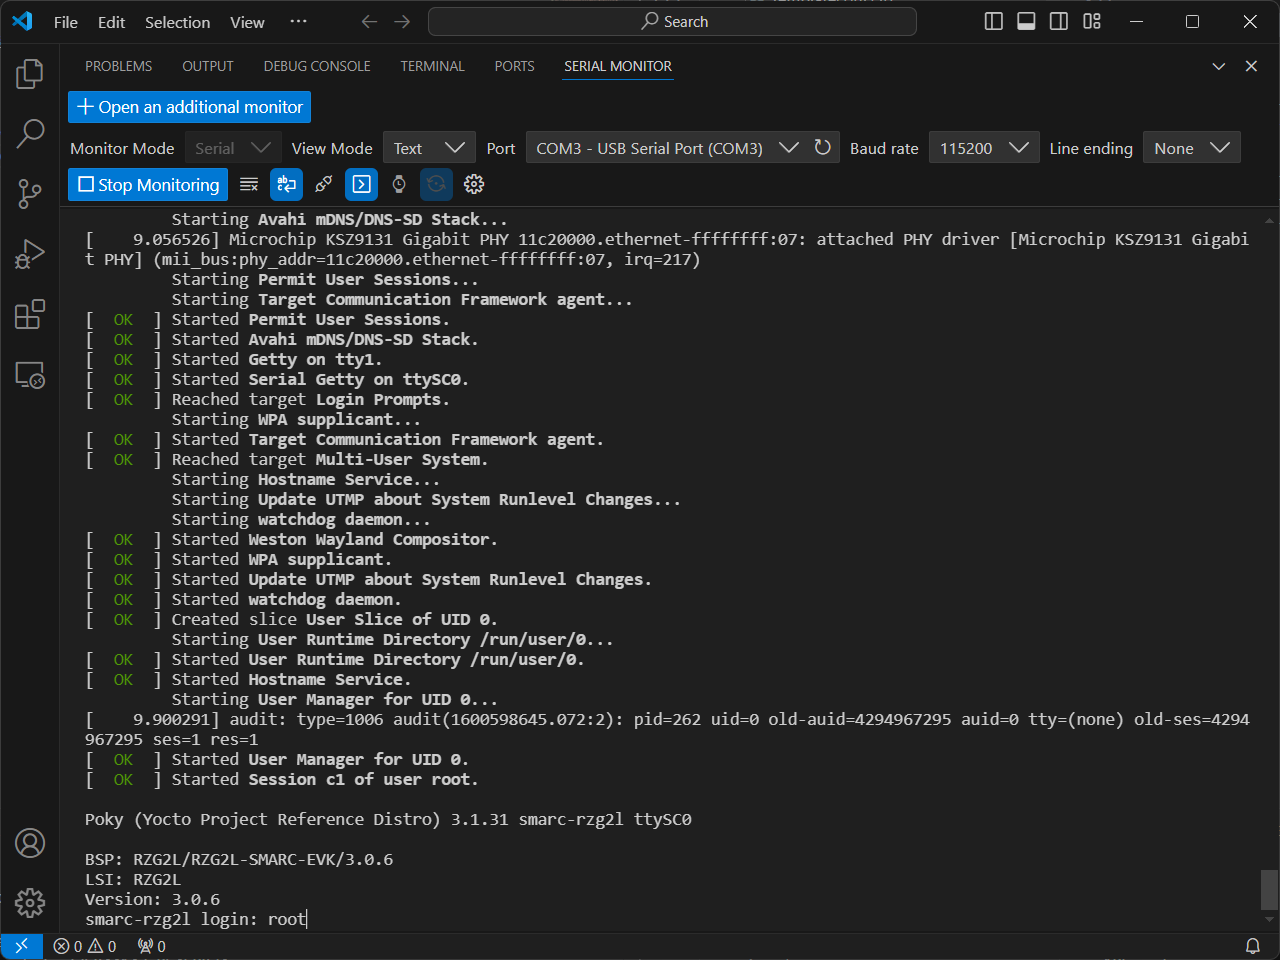
Open up the serial monitor in VS Code (ensure you have the Serial Monitor Extension installed first), select the port that is connected to the board, ensure you have toggled Terminal Mode and click on "Start Monitoring".
Reboot by pressing on the blue button on the board. You will start seeing start-up messages on the serial monitor. Once the start-up is complete, you will be prompted for a login. Simply enter root to login.
Congratulations! You have successfully booted up the RZ/G2L board. On the next tutorial, we will learn how to add programs to the build and execute the program from the board.